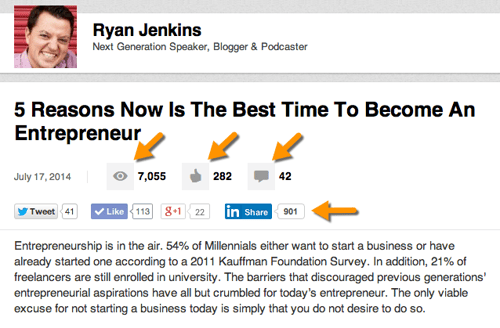
On July 17, 2014, I published a LinkedIn post titled: 5 Reasons Now Is The Best To Become An Entrepreneur (a repurposed blog post from March 17, 2014 - #batching) and as of this writing its gained 7,055 views, 282 likes, 42 comments, and 1,077 total social media shares. Here’s how I did it and how you can boost your professional brand with LinkedIn's publishing feature.
This is Part 2 of a 2 part series introducing you to the LinkedIn publishing platform. Part 1 was an introduction to the new feature where I listed the benefits, shared publishing tips, and defined the crucial LinkedIn terms. (Refer to the LinkedIn term index in Part 1 should you need any clarification on any of the terms mentioned in this post.)
Now, I don’t share the above post stats to impress you (besides the numbers are minuscule to many other posts) but rather to impress upon you the power of LinkedIn. Gone are the days where we have to rely on media outlets or a book deal to position ourselves as industry leaders. The tools are right in front us and the world awaits your unique expertise.
How To Use LinkedIn Publishing
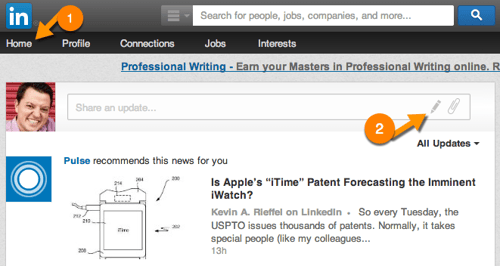
1) Visit your LinkedIn profile page and click the “Home" button.
2) Click the publish pencil icon. (If you don’t see this icon, you can request LinkedIn publishing access here.)
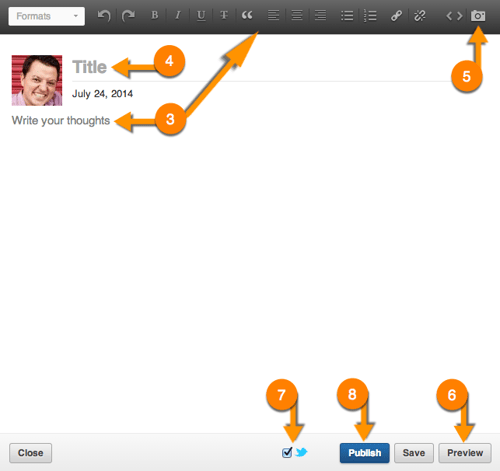
3) Enter the text for your post. Use the built in editing toolbar to format your text.
4) Enter a title. Make it engaging. Think about the titles of the articles you click to read.
5) Add an image for the article. (Chrome users may have an issue adding images due to a glitch. Use another web browser like Safari or Firefox to insert images.)
6) Click preview. This allows you to view what the post will look like after you publish it. Correct any formatting issues.
7) Share your post via Twitter. After you click publish, a Twitter pop-up appears with a pre-populated tweet which can be edited before tweeting. Don’t forget to use relevant hashtags for increased exposure. (This step is optional but highly recommended. If you believe in the value of your post, tell the world.)
8) Publish. Deep breath and click. You can continue to edit or event delete it after you publish.
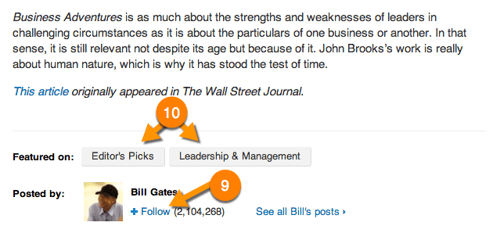
9) Gain Followers. Once published, your post will show up in the news feed of your network. At the bottom of the post users have the option to “Follow” you. This allows them to be notified of your future posts even though they are not a “connection.” (After publishing, your existing connections automatically become Followers and will be notified of your published post.)
10) If your post meets certain standards of the algorithm, it can be featured in the LinkedIn channels. Popular channels have millions of followers. LinkedIn takes quality into consideration when determining the algorithm of content distributing. For example, Bill Gates’ content below was featured in Editor’s Pick (naturally) and Leadership & Management. I was fortunate to have my content featured in the “Entrepreneurship & Small Business” channel. Don’t worry about cracking the code of the algorithm, just focus on your intended audience and their needs.
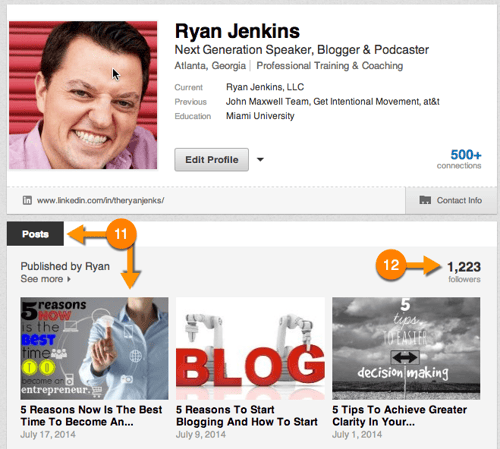
11) Once published, your posts will appear on your LinkedIn profile.
12) Once published, the number of “Followers” you have appears on your profile. This serves as social proof and can position you well as a thought/industry leader.
13) You and your readers can view how well the post is doing in the categories of: views, likes, comments, and how many times it was shared via which social network. LinkedIn will also send you emails about how your posts are doing.
Related Read: 7 Must-Haves To Grow An Audience Via LinkedIn Groups
Simple enough. The tough part is writing compelling content that’s worth sharing. Keep at it and know that the LinkedIn publishing platform is ready for you.
Reach on.
Question: Do you plan to use LinkedIn publishing to build your professional brand? Why or why not?

